Configure Your Status Page
What you’ll learn
Section titled “What you’ll learn”In this tutorial, you’ll learn how to customize your status page’s appearance and behavior. You’ll explore different display options, themes, and configuration settings to create a status page that matches your brand and communication style.
Prerequisites
Section titled “Prerequisites”- An openstatus account
- A status page already created (see Create a Status Page)
- At least one monitor added to your status page
What you’ll build
Section titled “What you’ll build”By the end of this tutorial, you’ll have:
- A customized status page with your preferred theme
- Configured status trackers displaying data your way
- Links to important resources
- Preview and live configuration experience
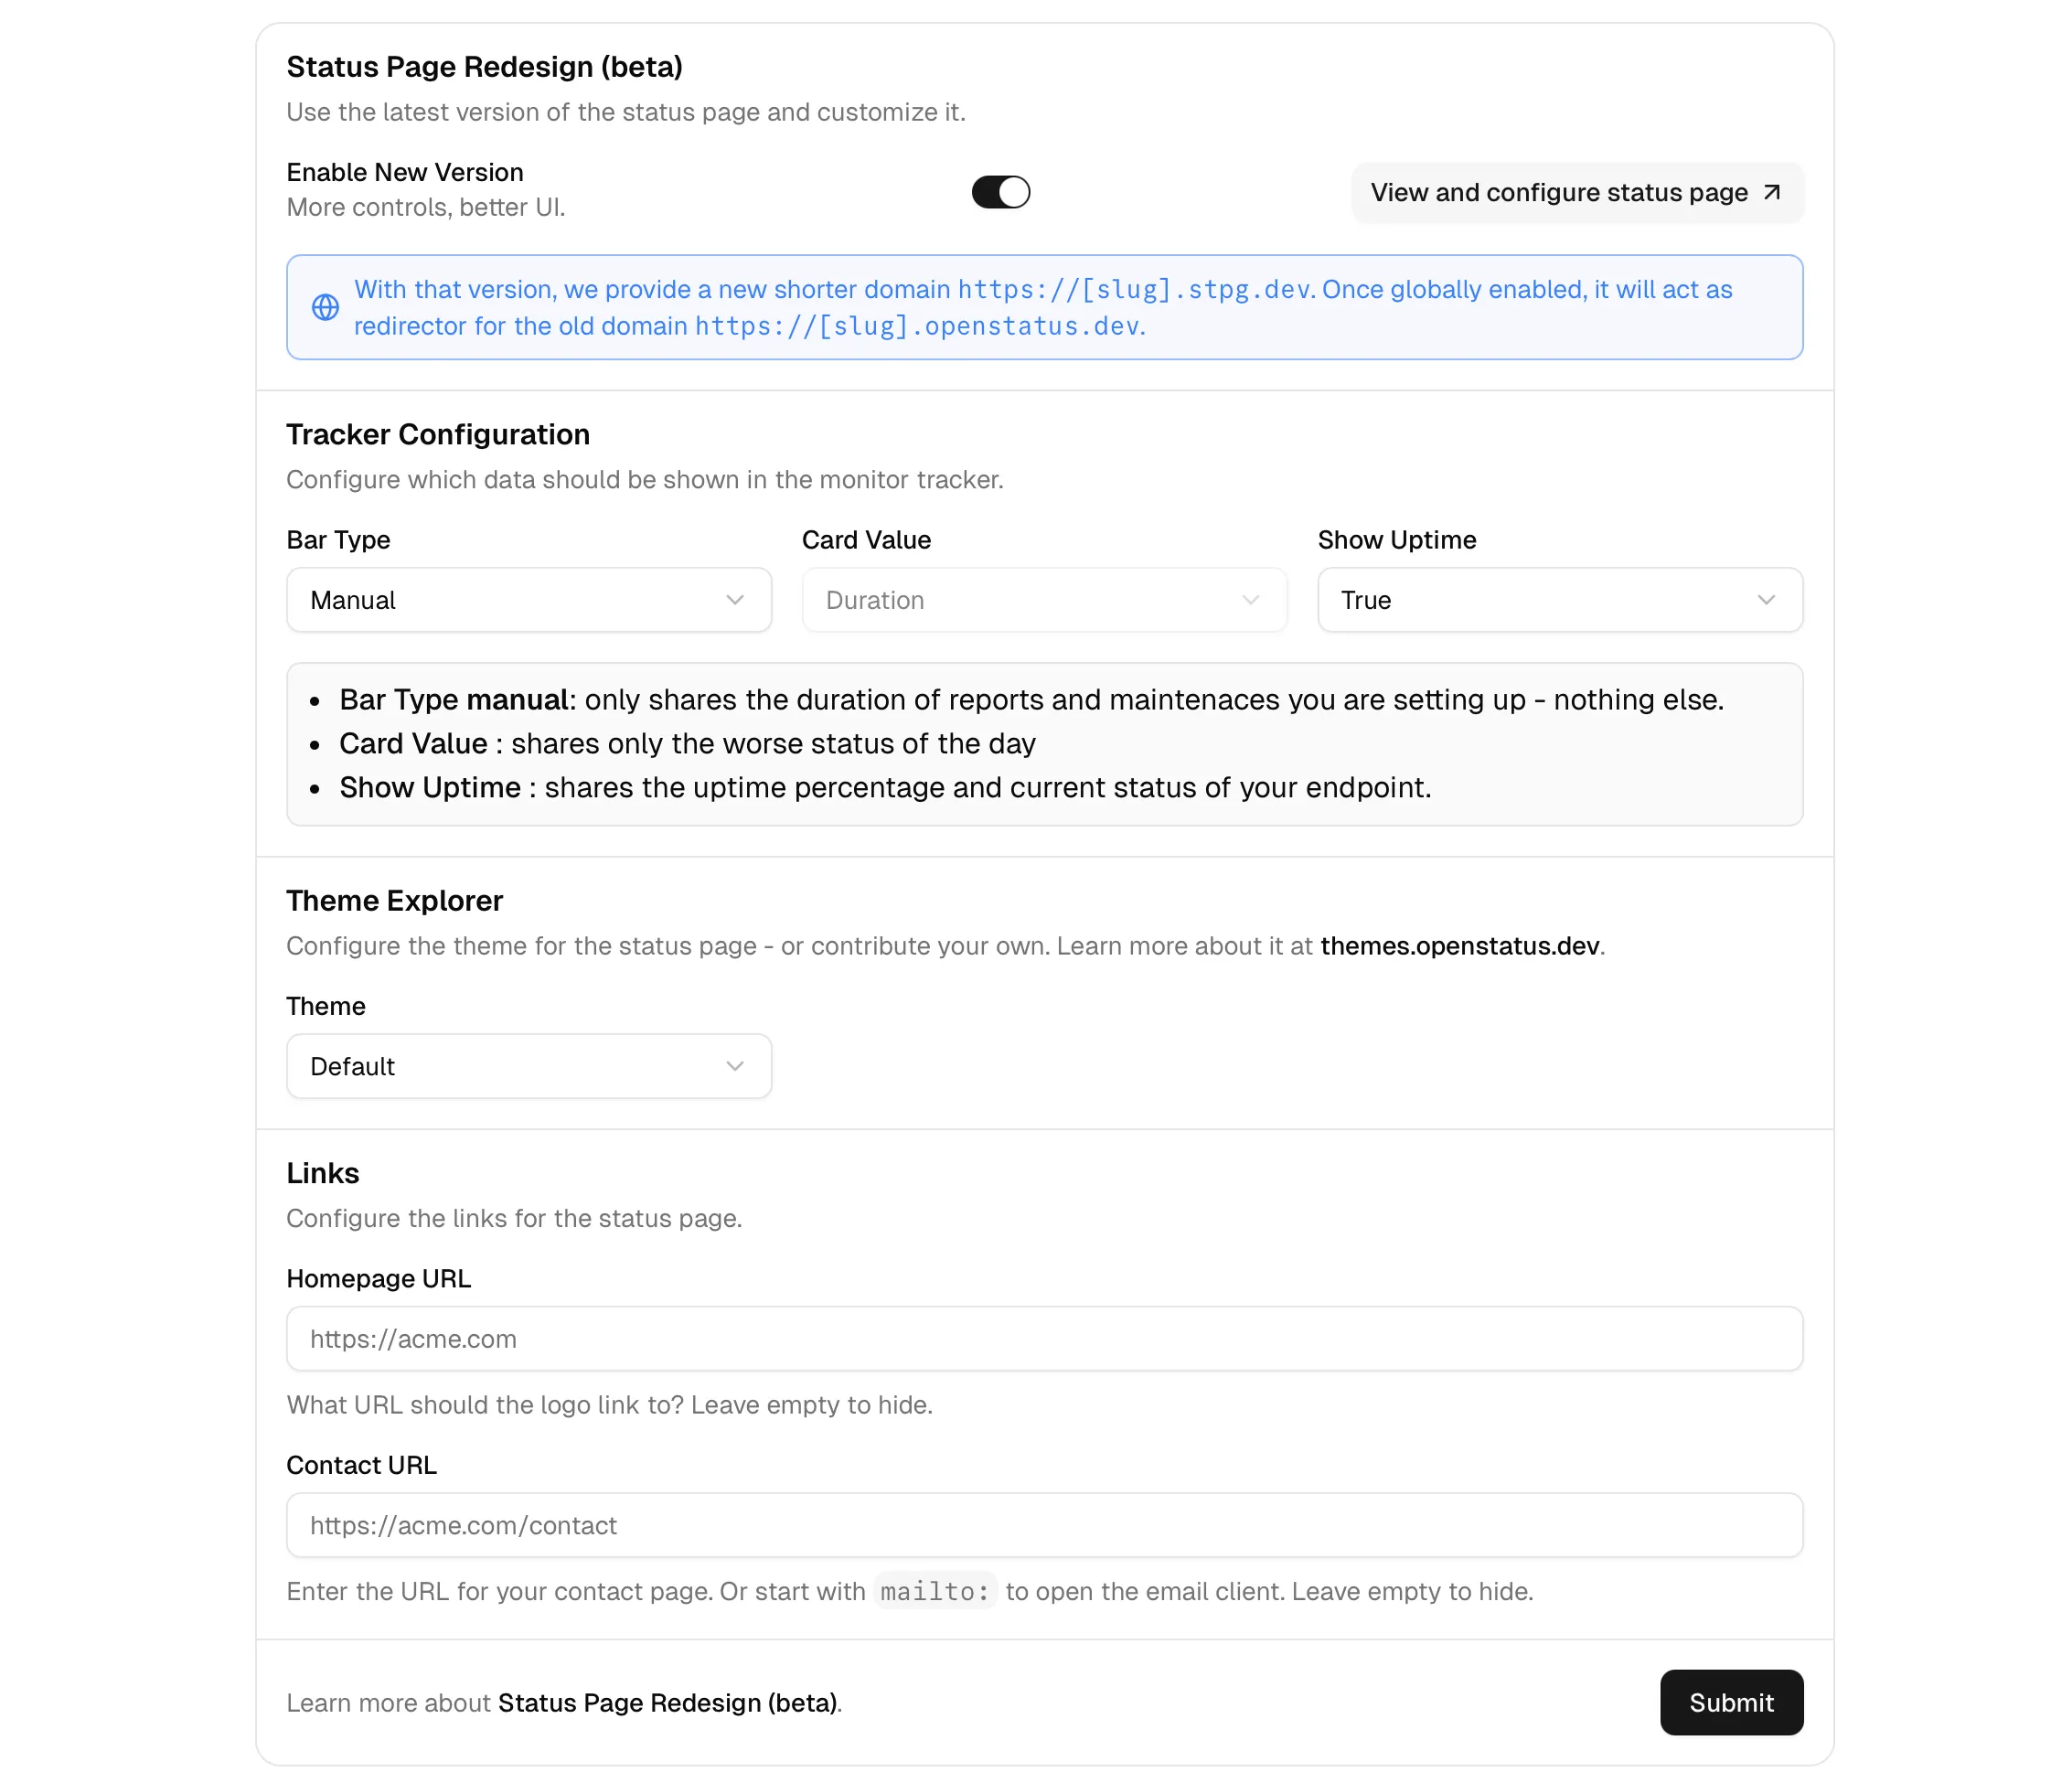
Status Page Redesign (Beta)
Section titled “Status Page Redesign (Beta)”We are releasing a new version of our status pages with enhanced customization options.
Explore available themes: https://themes.openstatus.dev
Get started
Section titled “Get started”Go to the Status Page Redesign (beta) section in your status page settings. Toggle the Enable New Version to support it. Once enabled, you’ll see two subsections:
- Tracker Configuration
- Theme Explorer
- Links
View and configure status page
Section titled “View and configure status page”Before choosing to enable the new page, we provide you with a way to check the configuration first. Click on the View and configure status page and you’ll get forwarded to your status page and a bottom right floating button will appear. Once you’re done, click on the Dashboard and you’ll be forwarded to your page where you get asked to save the config before continuing.
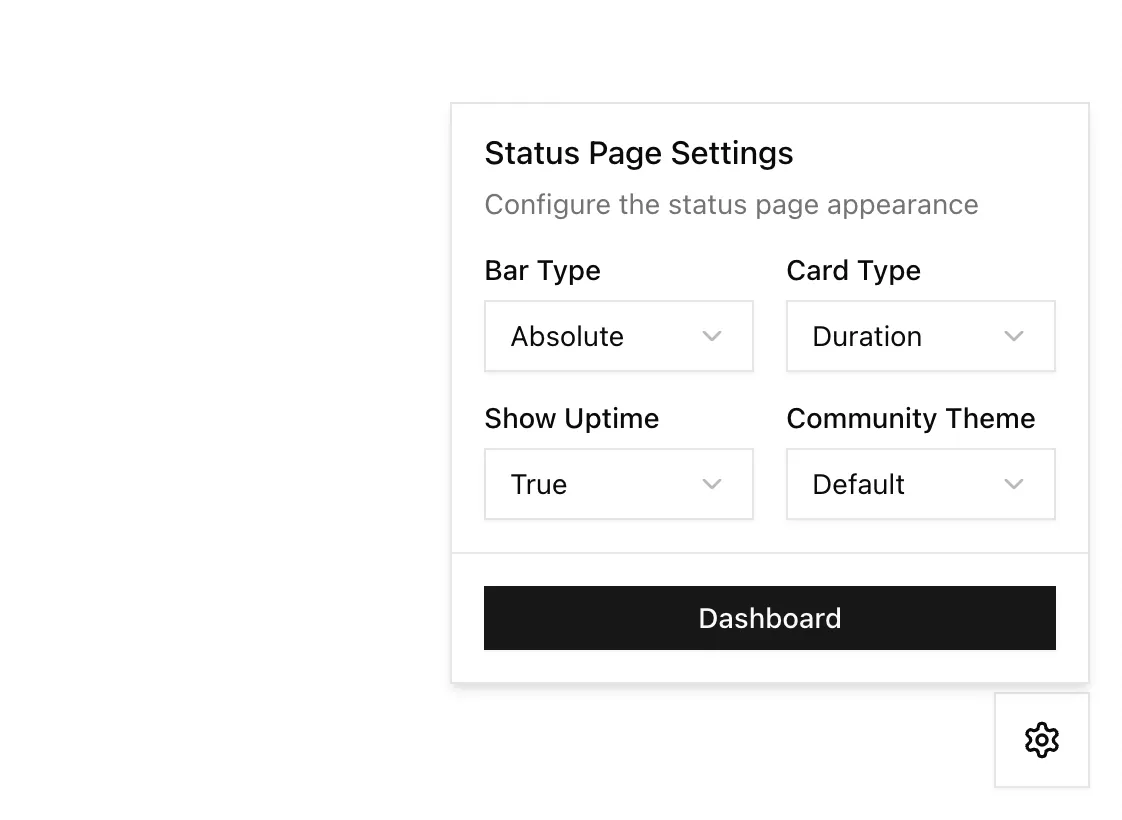
1. Tracker Configuration
Section titled “1. Tracker Configuration”We have three new status tracker configurations to provide you with a maximum choice of displaying the collected data.
Bar Type: How every ‘day’ is displayed in for a status tracker. Either absolute or manual.
Card Type: The card type is only configurable if the bar type is absolute. You’ll then be able to choose between duration, which will show the duration of “success”, “error”, “degraded” or “maintenance” reports or requests where we will share the number of request status itself. If manual bar type is chosen, we will only show the most significant status of the day.
Show Uptime: The uptime is calculated by ither the duration of the different reports or the request values depending on what you’ve chosen for the absolute value (incl. incidents). If you’ve chosen manual, it only gets calculated by the duration of your status reports.
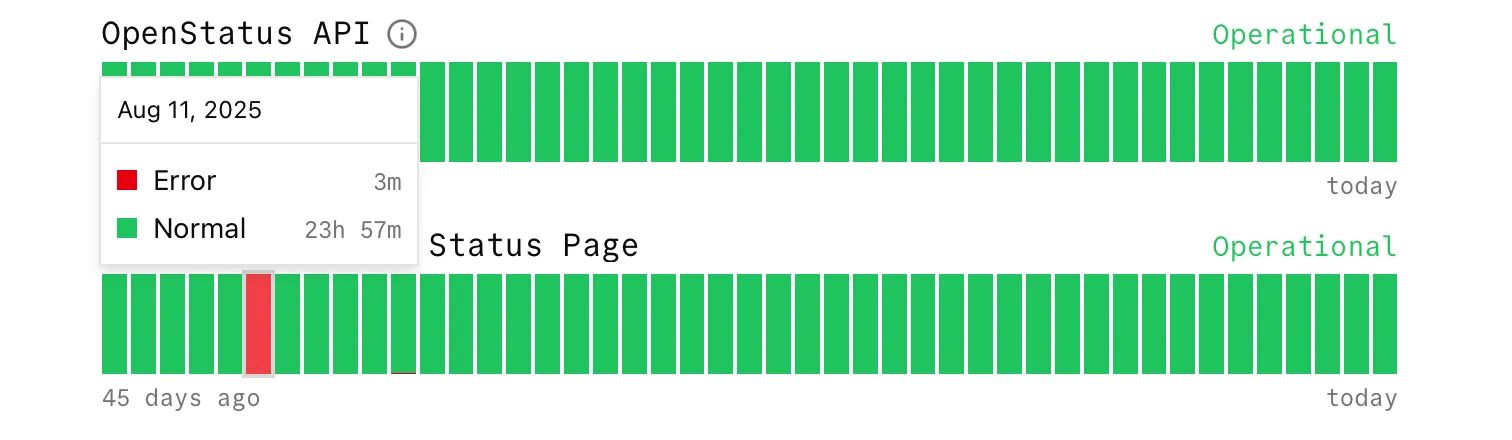
A few examples to understand it:
Example of absolute bar with duration card and showing uptime
Example of absolute bar with request card and hiding uptime

Example of manual bar with simple card and hiding uptime

2. Theme Explorer
Section titled “2. Theme Explorer”You can choose between different themes. We start with the following three:
default(openstatus)supabasegithub-high-contrast
Visit themes.openstatus.dev to see the list of supported themes. If you want, you can contribute your own to the list.
3. Links
Section titled “3. Links”Let’s have a closer look to your status page header navigation:
Homepage URL: Your logo will support linking to your own website.
Contact URL: If filled out, you will see a Message icon that users can click to forward them to a contact page. This can also be an email client by starting the input with mailto: (e.g. mailto:support@openstatus.dev).
We are adding some additional features. Feel free to let us know what’s missing!
What you’ve accomplished
Section titled “What you’ve accomplished”Excellent work! You’ve successfully:
- ✅ Enabled and configured the new status page design (beta)
- ✅ Customized status tracker display options
- ✅ Explored and applied theme settings
- ✅ Added navigation links to your status page
- ✅ Previewed changes before making them live
What’s next?
Section titled “What’s next?”Now that your status page is configured, you can:
- Configure Notifications - Alert your team when issues occur
- Building Trust with Status Pages - Learn effective incident communication
- Add Status Subscribers - Let users subscribe to updates
Learn more
Section titled “Learn more”- Status Page Reference - Complete configuration options
- Uptime Calculation Values - How uptime percentages work
Video Tutorial
Section titled “Video Tutorial”View, configure and enable the new status page